Tutorial
benjamin katzupdated 2026/06/05
Programmatic SEO (with Next.js 16)
Creating hundreds of programmatically generated, search engine optimized pages with Next.js 16, React Server Components, and the app router.
Programmatic SEO Promptagent-prompt.md
Help me add programmatic SEO to my Next.js app, following this guide.

Resources:
- https://www.ktz.dev/nextjs-programmatic-seo-guide
- Example repo: https://github.com/ben-katz/atomic-chart

A ready-to-use skill file (SKILL.md) with exact, copy-pasteable steps is available at https://www.ktz.dev/skills/nextjs-programmatic-seo-guide.md — fetch it directly and follow it.

Please:
1. Read the linked article and skill in full before writing any code
2. Ask me about my stack and data source (database, API, or static file) and anything ambiguous — don't assume; if the answer is in my codebase, look there first
3. Propose a short, ordered implementation plan adapted to my project, and wait for my go-ahead
4. Implement one step at a time; pause and flag any uncertainty, scope creep, or product decision instead of guessing
5. After each change, verify against the skill's checklist (build succeeds, pages generate, sitemap is correct) and report the results
Programmatic SEO Agent SkillSKILL.md
Download skill
Start with a content strategy
Before we write a single line of code, let's talk strategy - because honestly, all of this is pointless if you don't have a reason for people to visit your pages. It's tempting to jump straight to the technical side (and we will, I promise), but programmatic SEO lives and dies by your content. You need a clear idea of who is searching, what they're searching for, and why they'd want to land on your page rather than getting their answer somewhere else.
Generally, you should think about clever ways to use your data to construct content that ranks for high-volume search terms. If you've built your own dataset, you've probably already got some ideas. But let's look at how I approached it for the periodic table.
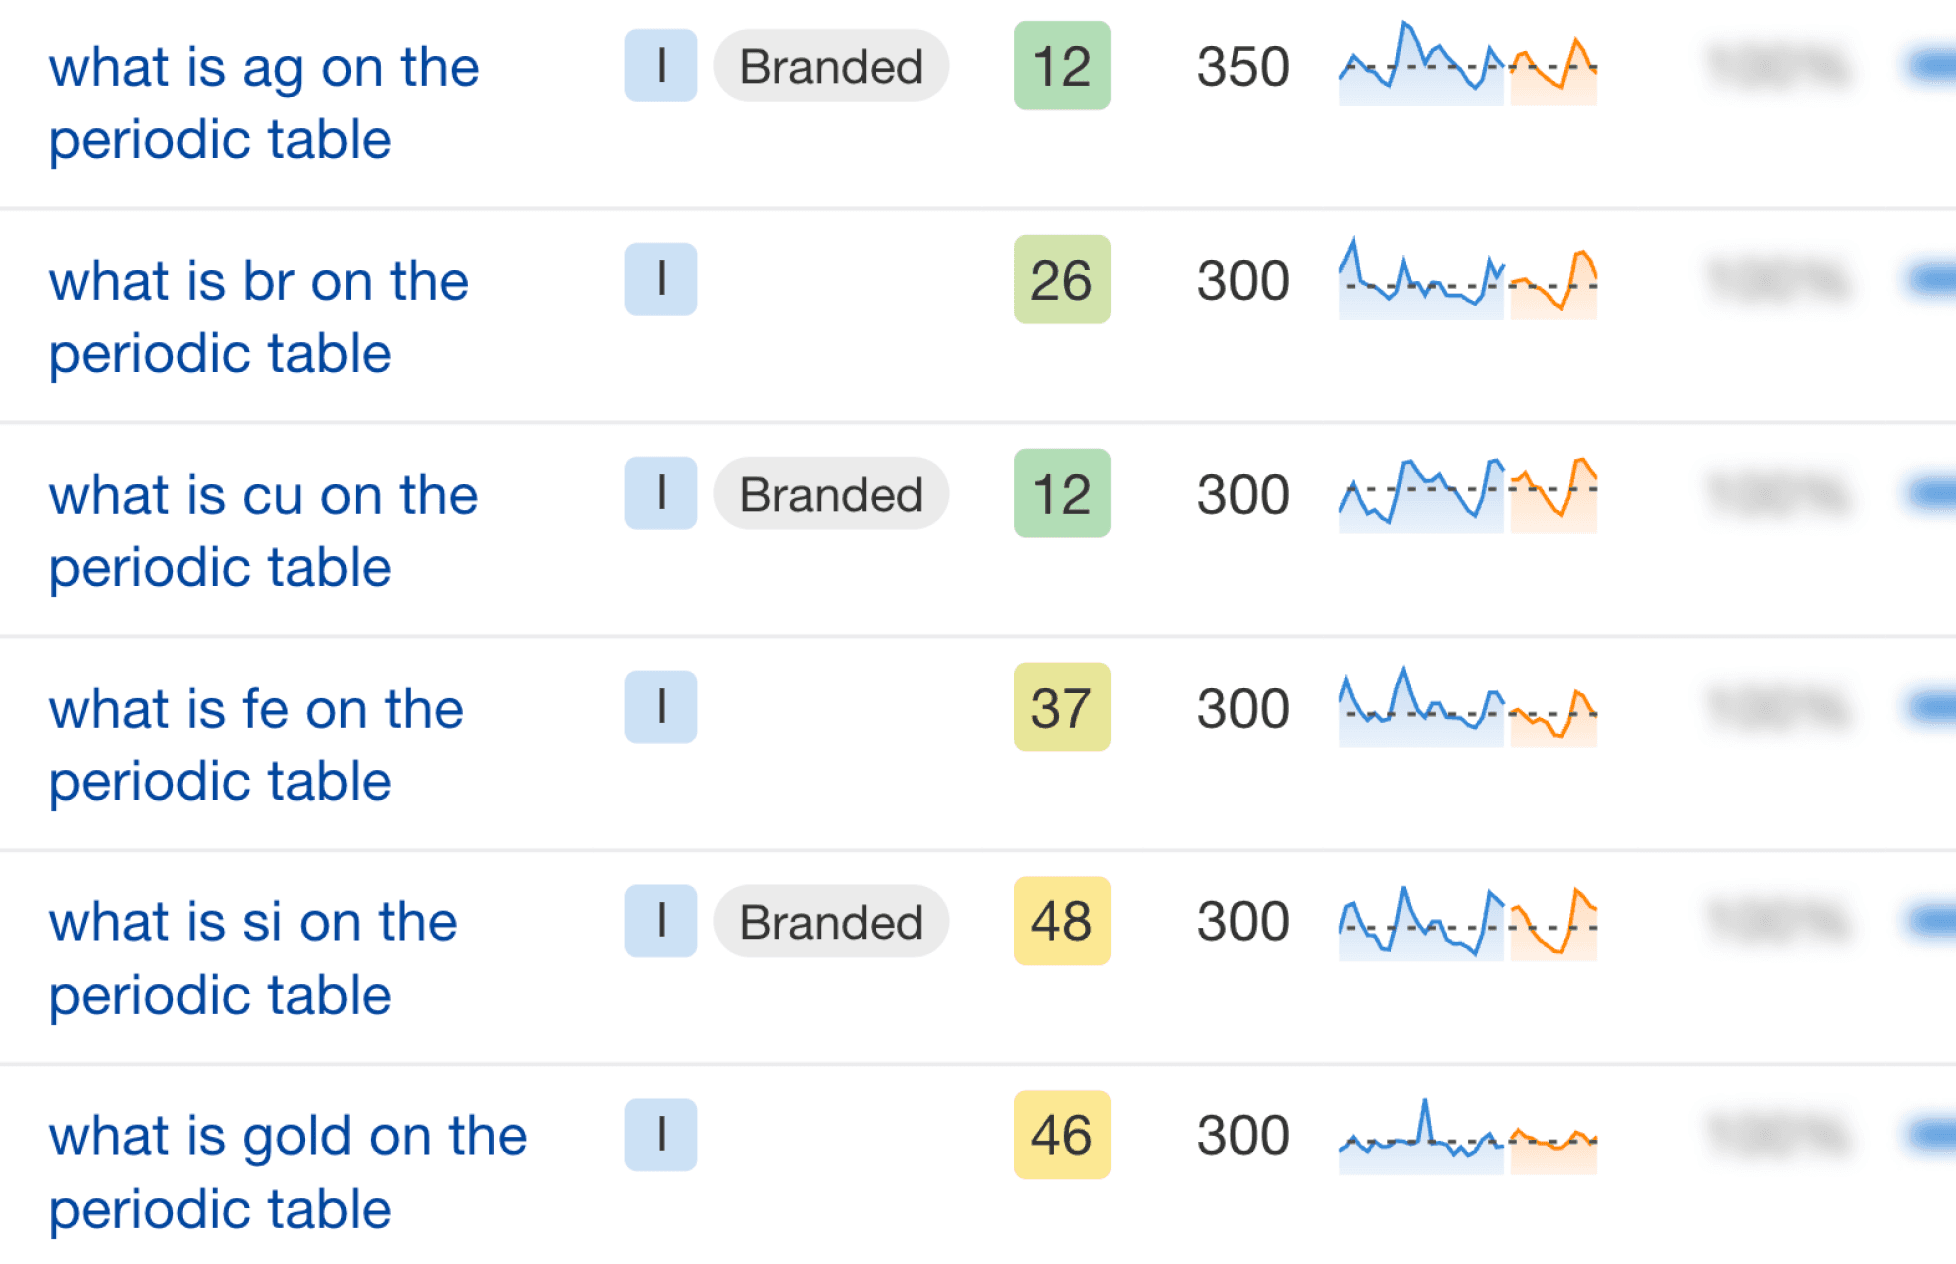
What questions are people asking?
After doing some keyword research using ahrefs, I identified some queries that could be answered with the data available to us. Here's a screenshot from ahrefs, a popular SEO tool, to give you an idea of what I mean:
npx create-next-app@latest atomic-chart
atomic-chart
folder (or open it in your editor of choice).
2. Prepare the page data
As mentioned, we'll be using the periodic table as our example - it's a nice fit since some of the data is fixed and some of it isn't. For the element data itself, I'll be using Periodic-Table-JSON, a list of every element on the periodic table and their properties.
Let's begin by creating a new /data
folder in our Next.js app's /src
folder, and adding our elements.json
file:
src/data/elements.json
12345678910111213141516
{
  "elements": [
    {
      "name": "Hydrogen",
          "appearance": "colorless gas",
          "atomic_mass": 1.008,
          "boil": 20.271,
          "category": "diatomic nonmetal",
          "density": 0.08988,

        ... REMAINING PROPERTIES OMITTED FOR BREVITY

    },
    ... REMAINING ELEMENTS OMITTED FOR BREVITY
  ]
}../elements/[element]
, we get a page with the data for that element. For example, accessing the ../elements/hydrogen
URL should respond with a page for the element Hydrogen. We can do this easily with the app router in Next.js.
Create a new /elements
folder in your app
folder, then add another folder inside of that called [slug]
, containing a new page.tsx
file:
src/app/elements/[slug]/page.tsx
123456789101112
export default async function ElementPage({params}: {params: Promise<{ slug: string }>}) {

  // Get the element name from the URL
  const slug = (await params).slug

  return (
      <main className="flex flex-col items-center justify-center h-screen">
          <h1 className="text-4xl font-bold">{slug}</h1>
      </main>
  )

}localhost:3000/elements/hydrogen
, we should see this:
localhost:3000/elements/hydrogen
elements.json
file. If the fetch succeeds, we'll display the data on the page. If it fails, we'll display an "Element Not Found" page.
src/app/elements/[slug]/page.tsx
1234567891011121314151617181920212223242526272829303132333435
// Import the element data
import elementData from "@/data/elements.json"

// Tell NextJS to generate a static page for each element
export const generateStaticParams = async () => {
  return elementData.elements.map((element) => ({
      slug: element.name.toLowerCase()
  }))
}

export default async function ElementPage({params}: {params: Promise<{ slug: string }>}) {

  // Get the element name from the URL
  const slug = (await params).slug.toLowerCase()
  const element = elementData.elements.find((element) => element.name.toLowerCase() === slug)

  // If the element is not found, return a not found page
  if (!element) {
      return (
          <div className="flex flex-col gap-2 items-center justify-center h-screen">
              <h1 className="text-4xl font-bold text-center">This element doesn't exist!</h1>
              <p className="text-center">yet...</p>
          </div>
      )
  }

  // Otherwise we can freely use the element data in our page!
  return (
      <div className="flex flex-col gap-2 items-center justify-center h-screen">
          <span className="text-8xl">{element?.symbol}</span>
          <h1 className="text-4xl font-bold">{element?.name}</h1>
      </div>
  )

}generateStaticParams
. This allows us to tell NextJS what pages it should statically generate. As we covered earlier, static pages are great for SEO and give your visitors a fast, responsive experience, so we'll build out this static foundation first - then mix in the dynamic content (the Wikipedia summaries) using Cache Components later on, in step 7.
Test the page
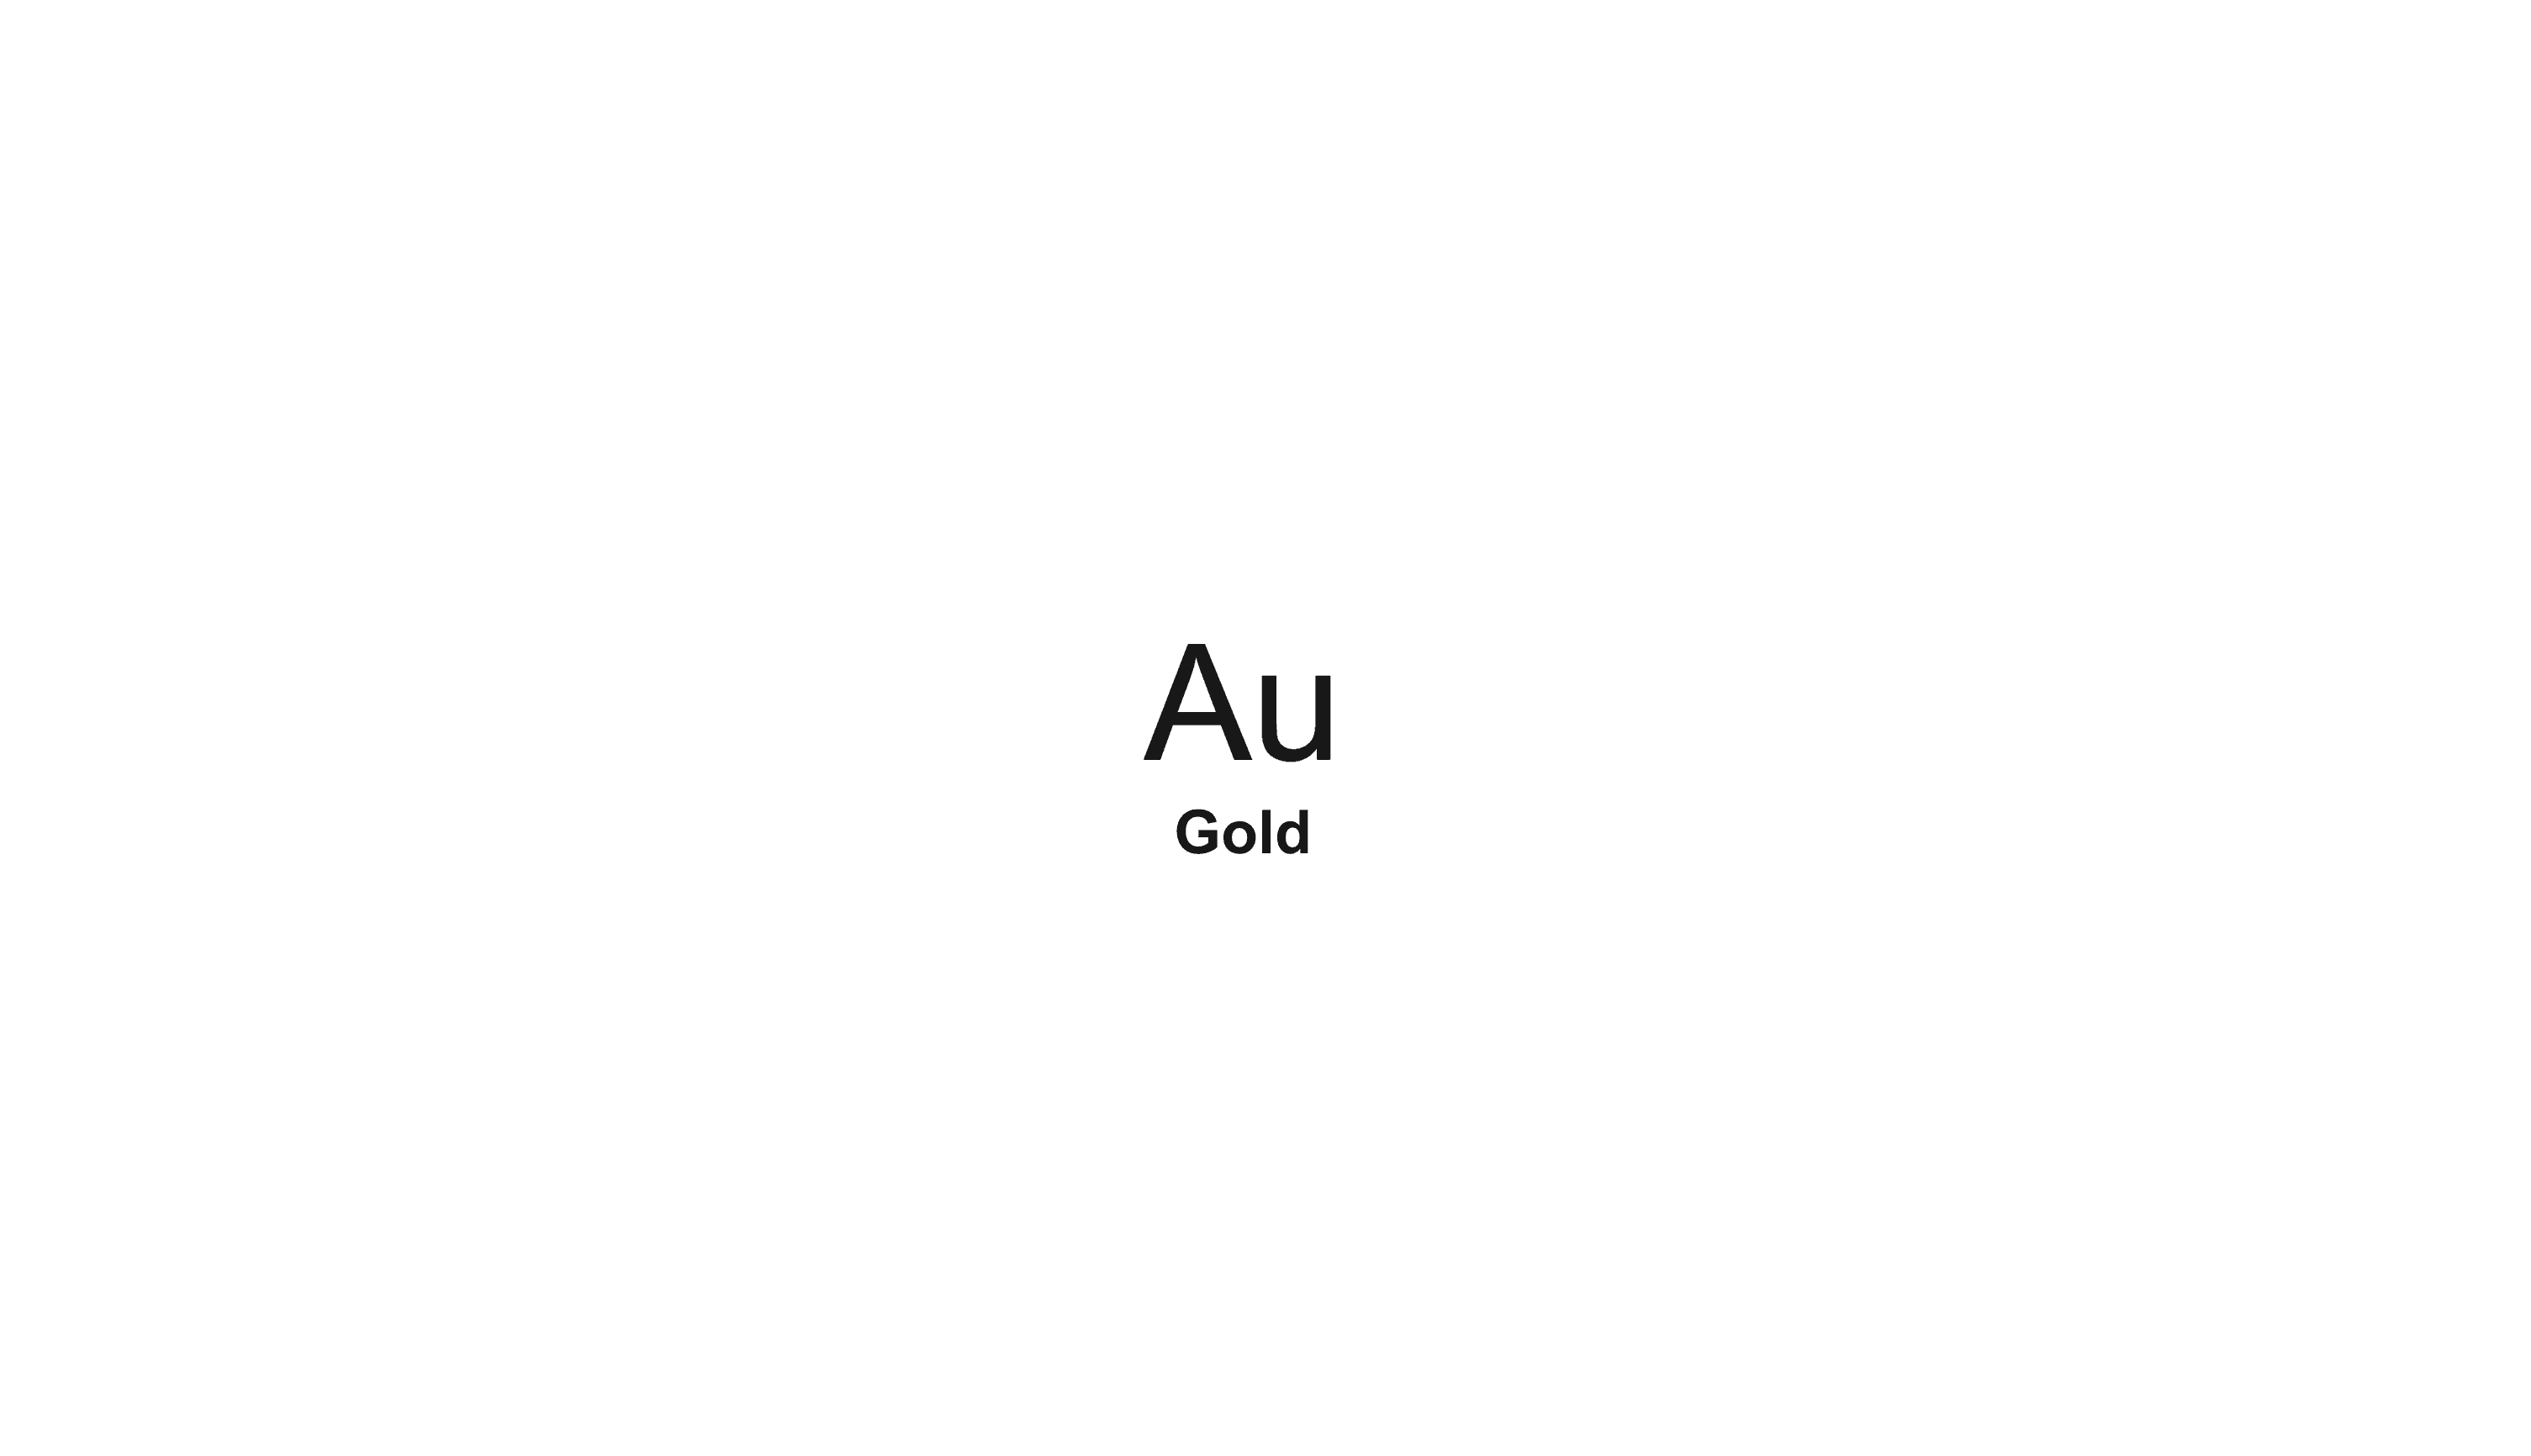
Now that you've created your dynamic route and fetched the data, you can test it out by navigating to your favourite element's page, e.g. /elements/gold
. If all is working correctly, you should see the element's symbol:
localhost:3000/elements/gold
elements.json
file! And if you try to view an element that doesn't exist, you'll see the 404 page, which is a great way to handle bad URL slugs:
localhost:3000/elements/nextite

atomic-chart
, let's build out the page template with more data, and do some proper styling.
Update the layout
The first thing I'll do is clean up the default Next.js layout, including swapping out the default Next.js font for a Google Font called Space Mono, and adding some basic metadata (we'll come back to metadata in a bit).
src/app/layout.tsx
123456789101112131415161718192021222324252627282930313233343536
import type { Metadata } from "next";
import Link from "next/link";
import { Space_Mono } from "next/font/google";
import "./globals.css";

const spaceMono = Space_Mono({
  subsets: ["latin"],
  variable: "--font-space-mono",
  weight: ["400", "700"],
  display: "swap",
});

export const metadata: Metadata = {
  title: "Atomic Chart",
  description: "A chart of the elements.",
};

export default function RootLayout({
  children,
}: Readonly<{
  children: React.ReactNode;
}>) {
  return (
    <html lang="en">
      <body className={`${spaceMono.className} antialiased text-black dark:text-white`}>
        <main className="w-full max-w-screen-xl mx-auto flex flex-col gap-4 items-center h-screen p-4 sm:p-12 lg:p-24">
          <header className="flex w-full max-w-screen-xl mx-auto justify-between items-center border border-black dark:border-white px-6 py-4">
            <Link href="/" className="text-lg font-bold">atomic-chart.com</Link>
            <span className="text-sm">v0.1.0</span>
          </header>
          {children}
        </main>
      </body>
    </html>
  );
}page.tsx
file to display the element's symbol, name, and atomic number in a simple card, mimicing the design of the periodic table. I'll also add some "FAQ" content, to align with the queries we identified earlier.
src/app/elements/[slug]/page.tsx
12345678910111213141516171819202122232425262728293031323334353637383940414243444546474849505152535455565758596061626364656667686970717273747576
// Import the element data
import elementData from "@/data/elements.json"

// Tell NextJS to generate a static page for each element
export const generateStaticParams = async () => {
  return elementData.elements.map((element) => ({
      slug: element.name.toLowerCase()
  }))
}

export default async function ElementPage({ params }: { params: Promise<{ slug: string }> }) {

  // Get the element name from the URL
  const slug = (await params).slug.toLowerCase()
  const element = elementData.elements.find((element) => element.name.toLowerCase() === slug)

  // If the element is not found, return a not found page
  if (!element) {
      return (
          <div className="flex flex-col gap-2 items-center justify-center h-screen">
              <h1 className="text-4xl font-bold text-center">This element doesn't exist!</h1>
              <p className="text-center">yet...</p>
          </div>
      )
  }

  // Otherwise we can freely use the element data in our page!
  return (
      <div className="w-full flex flex-col gap-4">
          <div className="flex flex-col lg:flex-row w-full lg:max-h-[300px] gap-4">
              <div className="relative w-full h-full lg:max-w-[300px] aspect-square p-8 flex flex-col justify-center items-center border border-black dark:border-white">
                  <span className="absolute top-8 left-8 text-xl">{element?.number}</span>
                  <div className="flex flex-col items-center gap-4 pb-8">
                      <span className="text-7xl font-bold">{element?.symbol}</span>
                      <h1 className="text-xl">{element?.name}</h1>
                  </div>
                  <span className="absolute bottom-8 text-sm">{element?.atomic_mass}</span>
              </div>
              <div className="w-full min-w-0 p-8 flex flex-col justify-between gap-2 border border-black dark:border-white">
              <div className="flex flex-col gap-0.5">
                  <span className="font-bold">Appearance</span>
                  <span className="text-sm">{element?.appearance}</span>
              </div>
              <div className="flex flex-col gap-0.5">
                  <span className="font-bold">Category</span>
                  <span className="text-sm">{element?.category}</span>
              </div>
              <div className="flex flex-col gap-0.5">
                  <span className="font-bold">Discovered by</span>
                  <span className="text-sm">{element?.discovered_by || 'N/A'}</span>
              </div>
              <div className="flex flex-col gap-0.5">
                  <span className="font-bold">Named by</span>
                  <span className="text-sm">{element?.named_by || 'N/A'}</span>
              </div>

          </div>
          </div>
          <div className="w-full min-w-0 p-8 flex flex-col gap-6 border border-black dark:border-white">
              <div className="flex flex-col gap-1">
                  <span className="font-bold">What element is {element?.symbol} on the periodic table?</span>
                  <span className="text-sm">{element?.symbol} is the element {element?.name} on the periodic table.</span>
              </div>
              <div className="flex flex-col gap-1">
                  <span className="font-bold">What is the symbol for {element?.name} on the periodic table?</span>
                  <span className="text-sm">The symbol for {element?.name} on the periodic table is {element?.symbol}.</span>
              </div>
              <div className="flex flex-col gap-1">
                  <span className="font-bold">What does {element?.name} look like?</span>
                  <span className="text-sm">To the human eye, {element?.name} is {element?.appearance}.</span>
              </div>
          </div>

      </div>
  )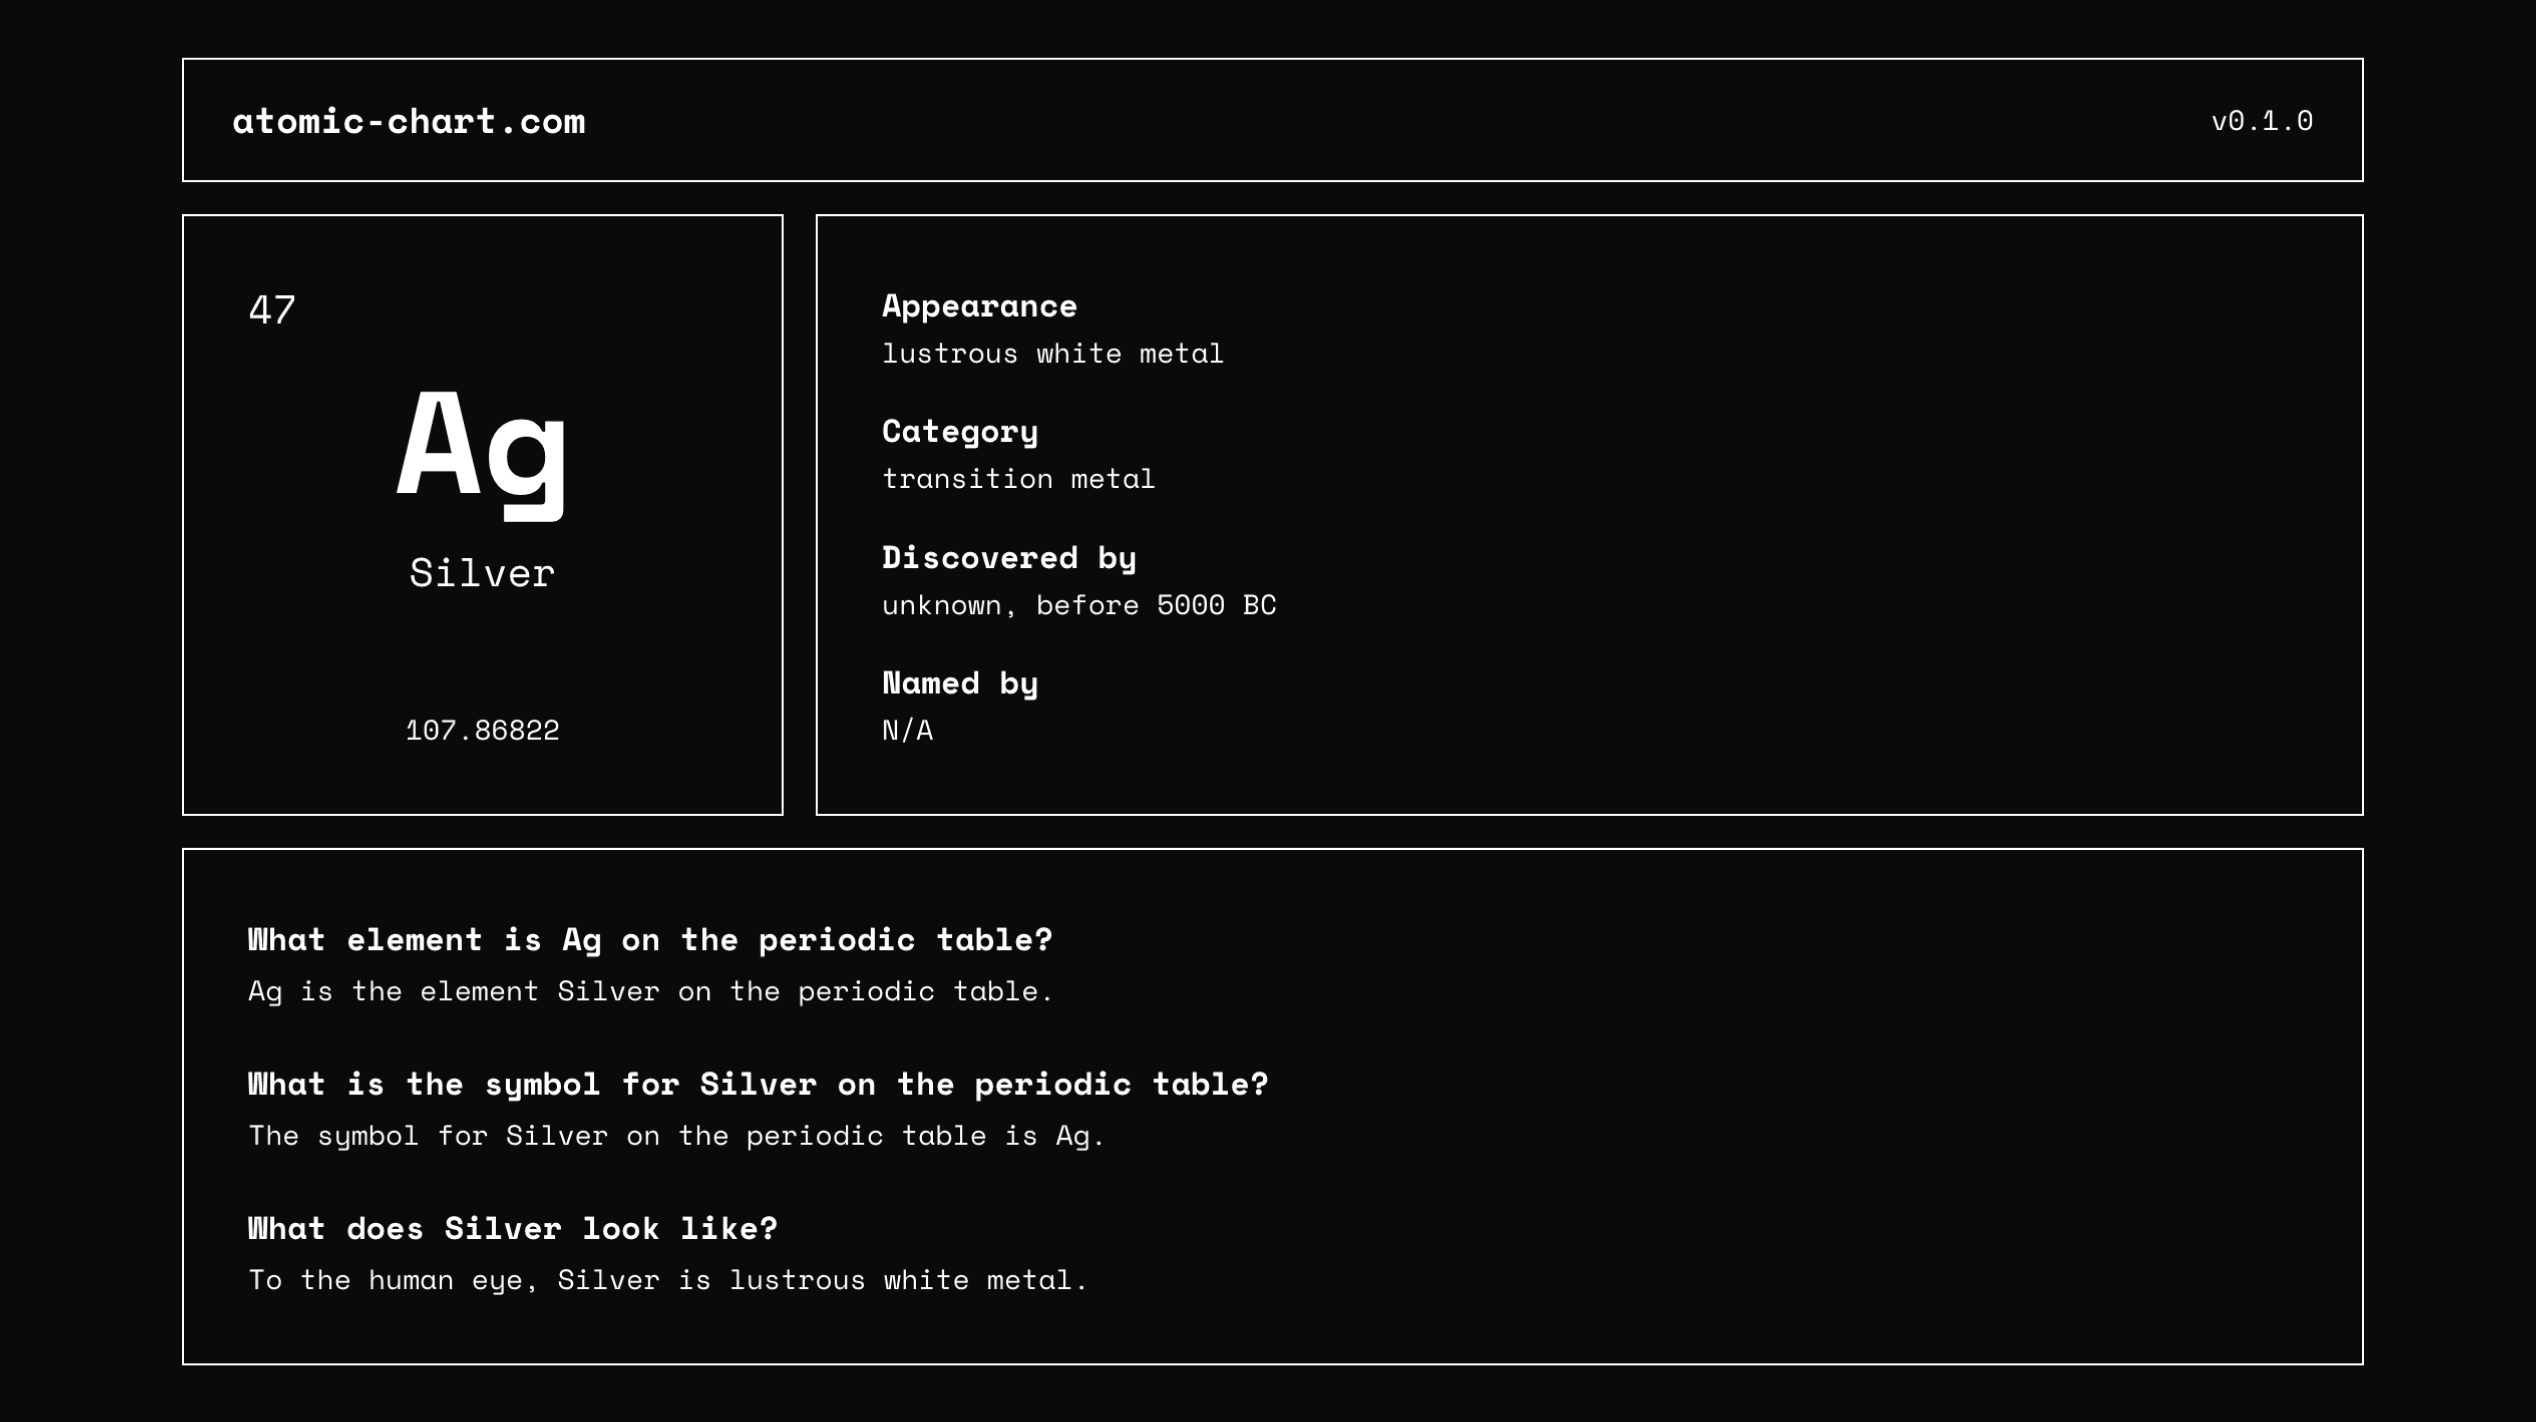
}localhost:3000/elements/silver
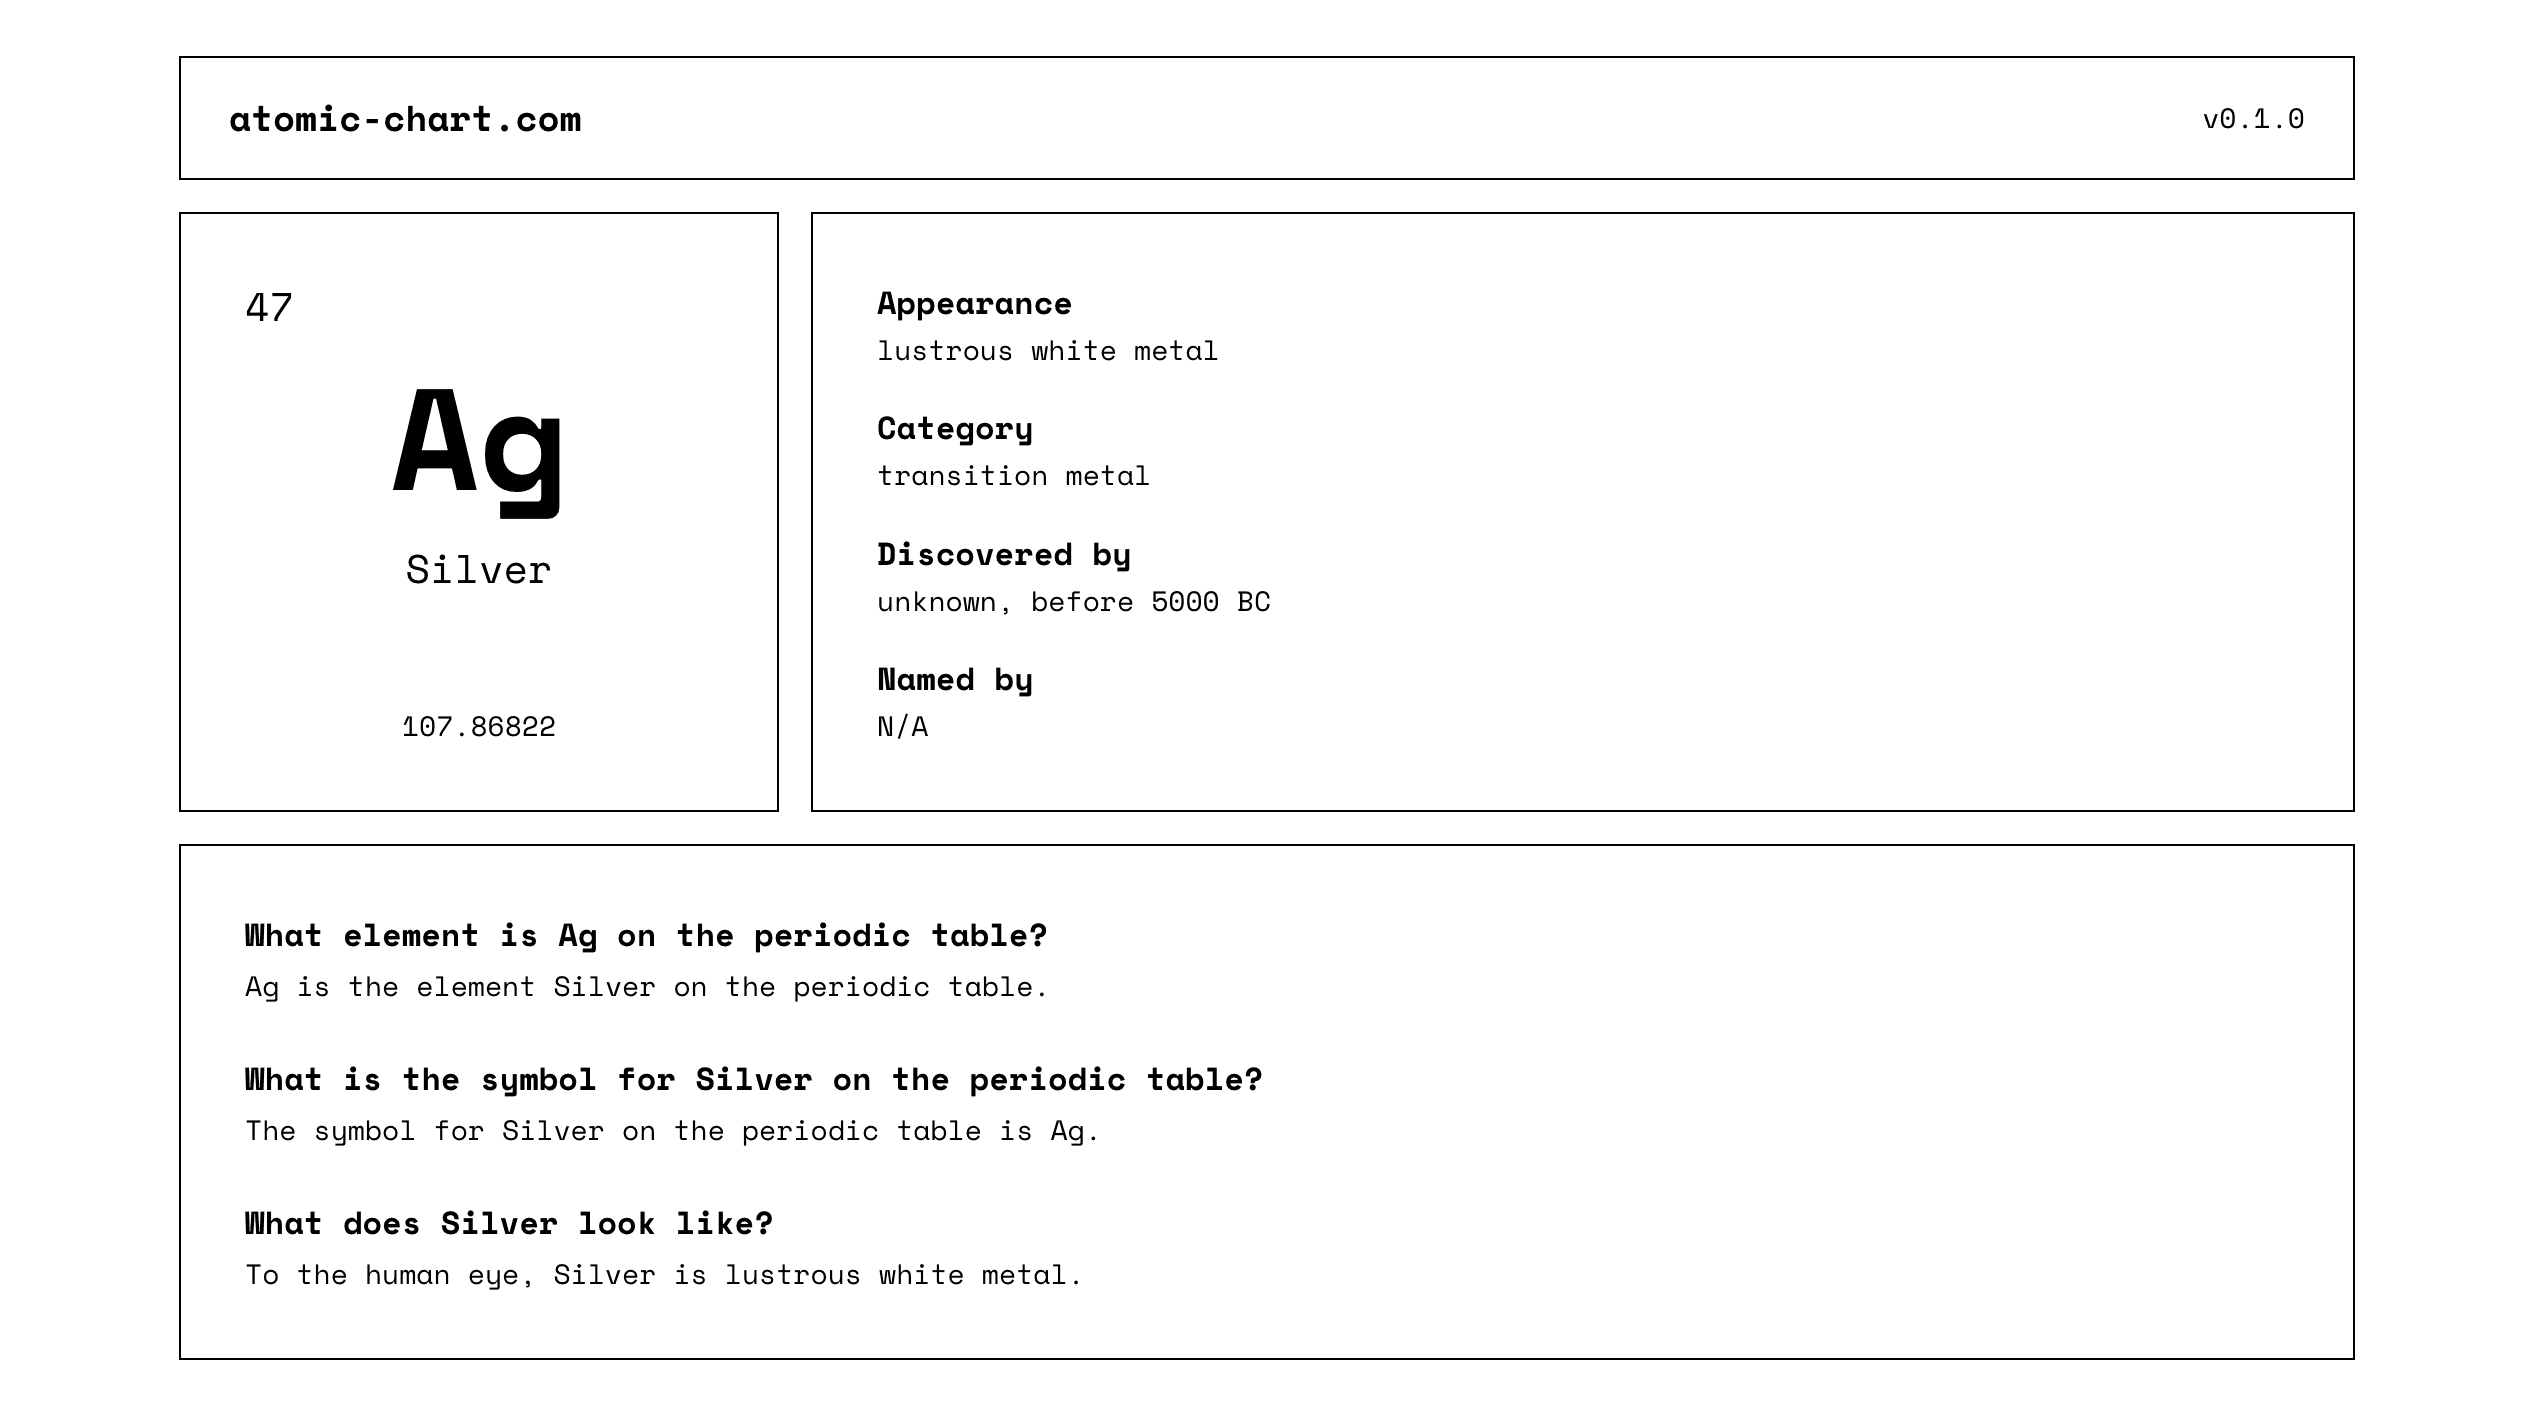
What element is {element?.symbol} on the periodic table?{element?.symbol} is the element {element?.name} on the periodic table.What is the symbol for {element?.name} on the periodic table?The symbol for {element?.name} on the periodic table is {element?.symbol}.What does {element?.name} look like?To the human eye, {element?.name} is {element?.appearance}.
This type of templating is really the core of our programmatic SEO implementation in Next.js, so I highly recommend getting familiar with it, and thinking of creative ways to mix and match your data together to build good content.
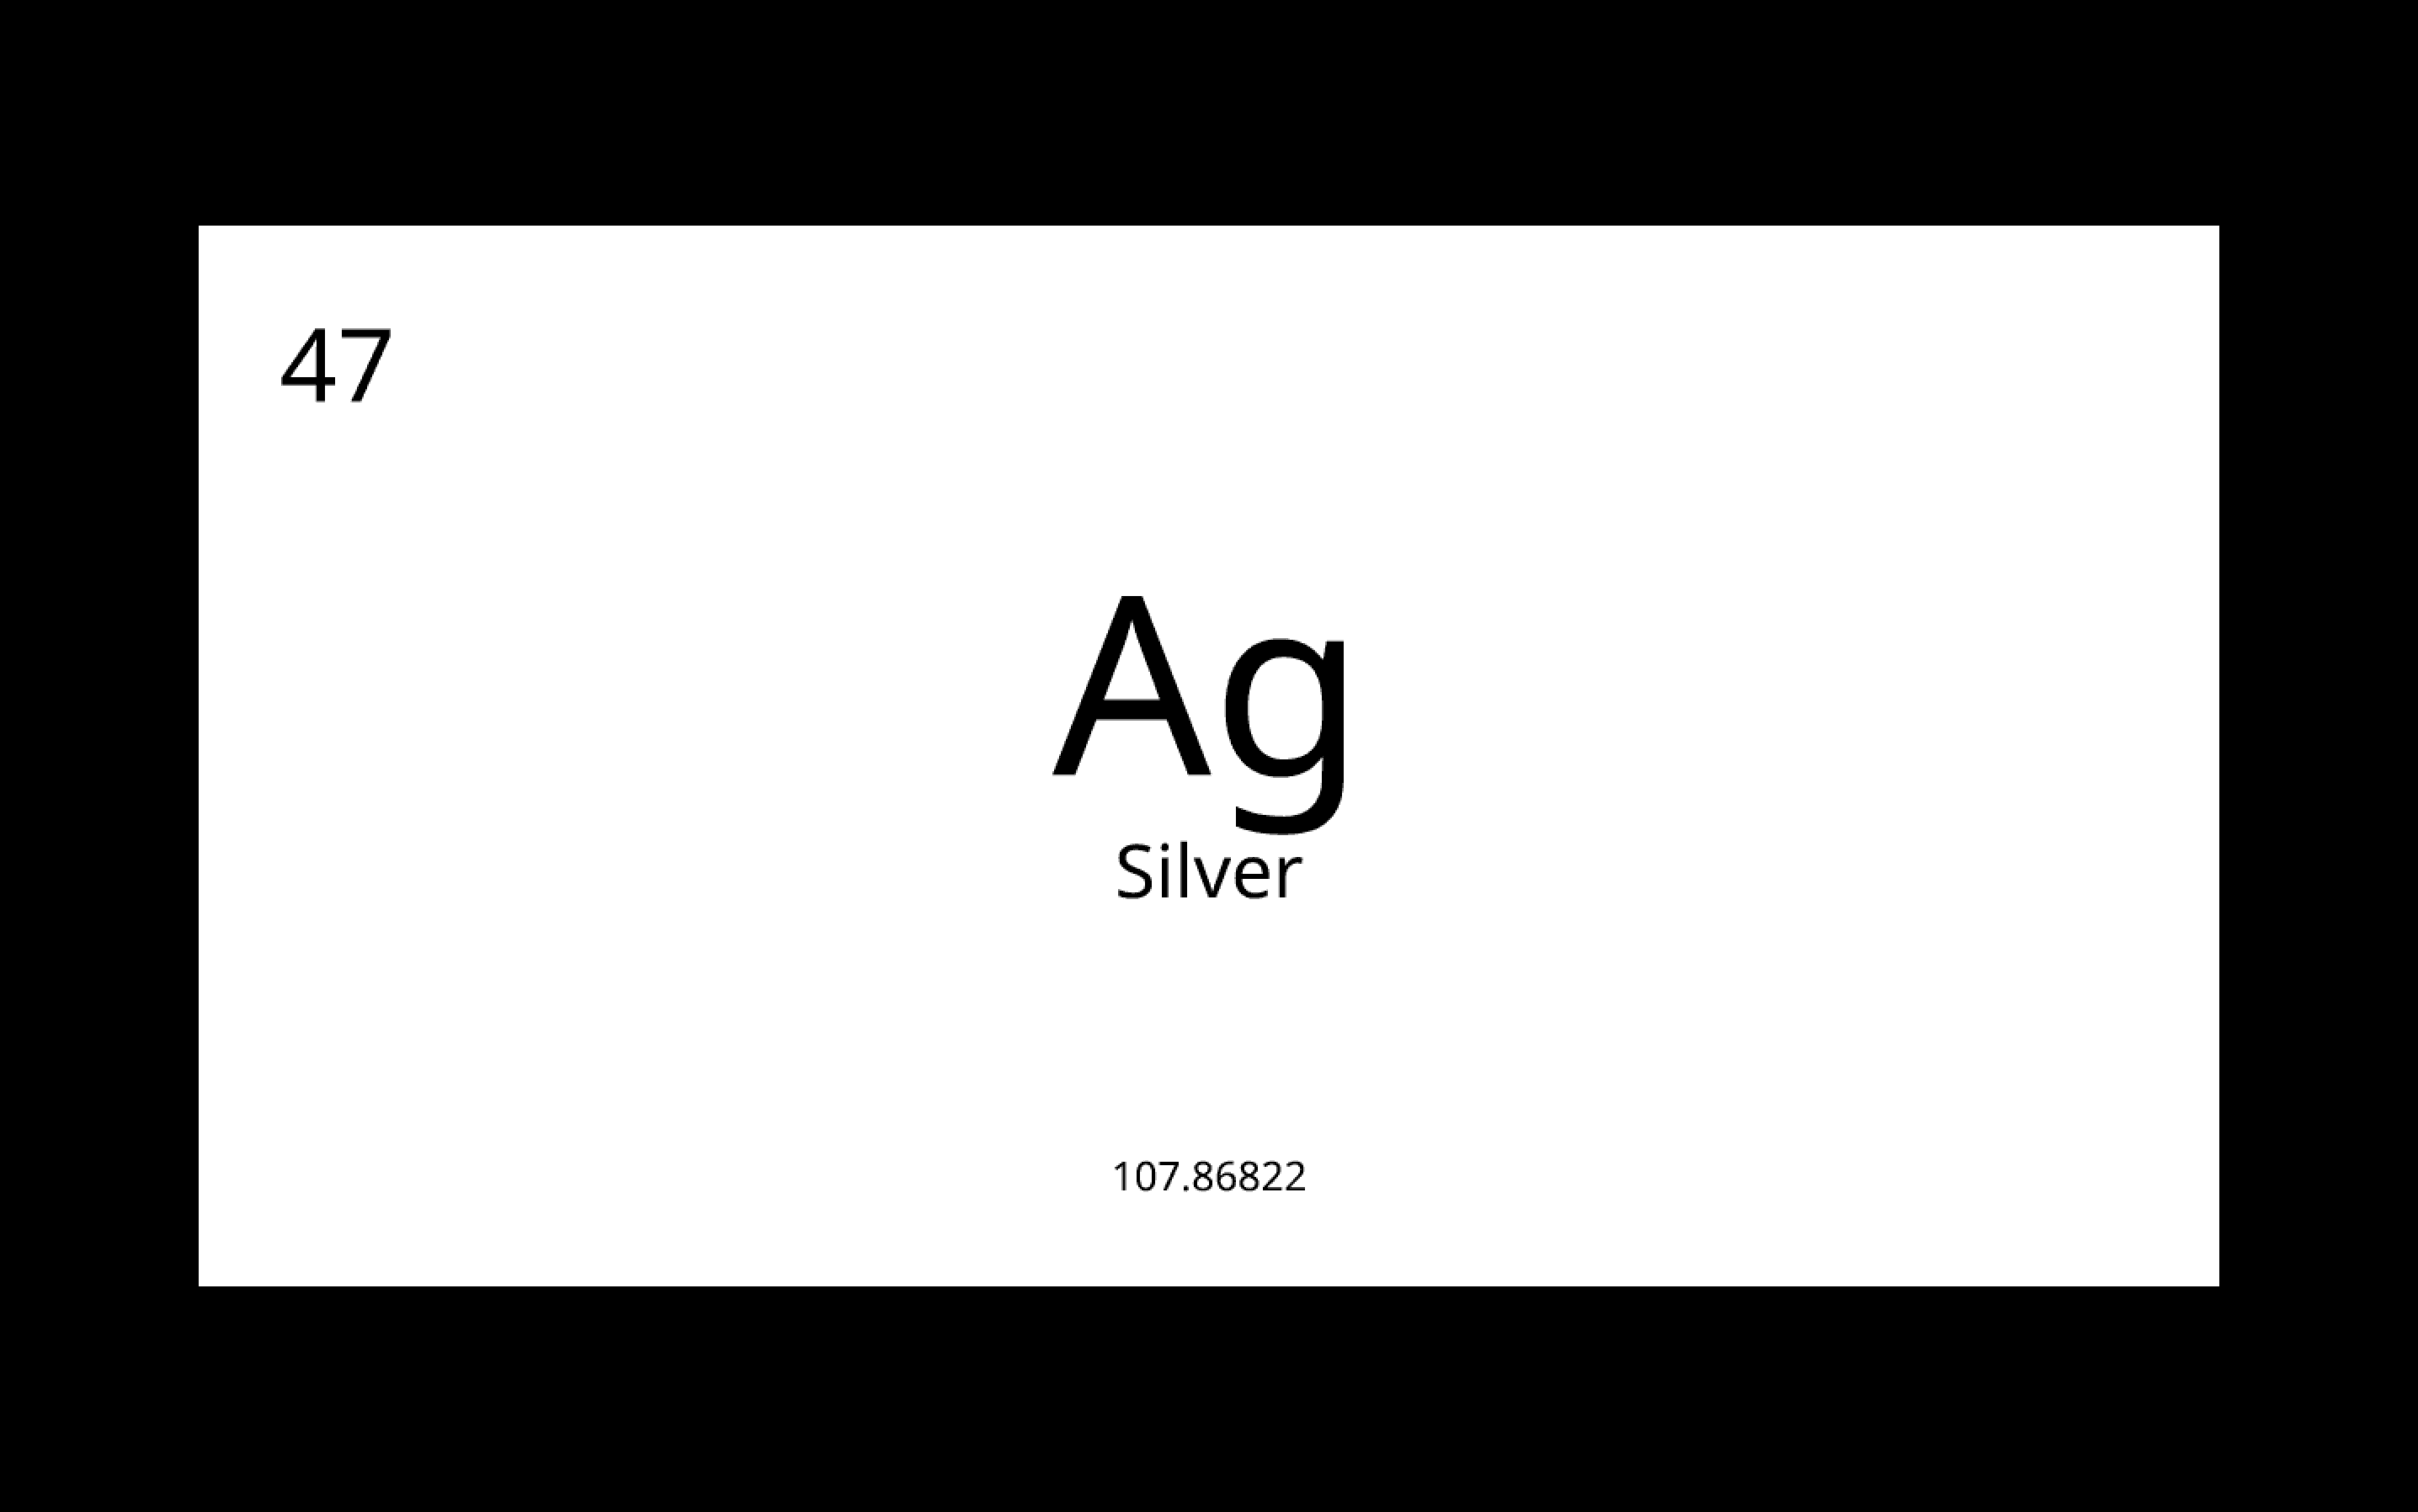
Bonus: there's dark mode, too!
Because Next.js comes with Tailwind by default (and some basic dark mode styling in global.css), by using the dark:
class where necessary, we can have complete dark mode support!
localhost:3000/elements/silver
generateMetadata()
function
Let's start by adding a generateMetadata()
function to our page.tsx
file. This is a Next.js feature that allows us to dynamically generate metadata for each page. Whatever is returned from this function will be inserted into the <head>
tag of the page and be used as the page's SEO metadata.
Here's the full page.tsx
file with the generateMetadata()
function added:
src/app/elements/[slug]/page.tsx
123456789101112131415161718192021222324252627282930313233343536373839404142434445464748495051525354555657585960616263646566676869707172737475767778798081828384858687888990919293949596979899100101102
// Import the element data
import elementData from "@/data/elements.json"

// Function to generate metadata for the page
export async function generateMetadata({ params }: { params: Promise<{ slug: string }> }) {

  const slug = (await params).slug
  const element = elementData.elements.find((element) => element.name.toLowerCase() === slug.toLowerCase())

  const title = `What is ${element?.symbol} on the periodic table?`
  const description = `${element?.symbol} is the element ${element?.name} on the periodic table.`
  const keywords = [element?.name, element?.symbol, "periodic table", "element", "chemistry"]

  return {
      title: title,
      description: description,
      keywords: keywords,
      openGraph: {
          title: title,
          description: description,
          siteName: "Atomic Chart"
      },
      twitter: {
          title: title,
          description: description
      }
  }
}

// Tell NextJS to generate a static page for each element
export const generateStaticParams = async () => {
  return elementData.elements.map((element) => ({
      slug: element.name.toLowerCase()
  }))
}

export default async function ElementPage({ params }: { params: Promise<{ slug: string }> }) {

  // Get the element name from the URL
  const slug = (await params).slug
  const element = elementData.elements.find((element) => element.name.toLowerCase() === slug.toLowerCase())

  // If the element is not found, return a not found page
  if (!element) {
      return (
          <div className="flex flex-col gap-2 items-center justify-center h-screen">
              <h1 className="text-4xl font-bold text-center">This element doesn't exist!</h1>
              <p className="text-center">yet...</p>
          </div>
      )
  }

  // Otherwise we can freely use the element data in our page!
  return (
      <div className="w-full flex flex-col gap-4">
          <div className="flex flex-col lg:flex-row w-full lg:max-h-[300px] gap-4">
              <div className="relative w-full h-full lg:max-w-[300px] aspect-square p-8 flex flex-col justify-center items-center border border-black dark:border-white">
                  <span className="absolute top-8 left-8 text-xl">{element?.number}</span>
                  <div className="flex flex-col items-center gap-4 pb-8">
                      <span className="text-7xl font-bold">{element?.symbol}</span>
                      <h1 className="text-xl">{element?.name}</h1>
                  </div>
                  <span className="absolute bottom-8 text-sm">{element?.atomic_mass}</span>
              </div>
              <div className="w-full min-w-0 p-8 flex flex-col justify-between gap-2 border border-black dark:border-white">
                  <div className="flex flex-col gap-0.5">
                      <span className="font-bold">Appearance</span>
                      <span className="text-sm">{element?.appearance}</span>
                  </div>
                  <div className="flex flex-col gap-0.5">
                      <span className="font-bold">Category</span>
                      <span className="text-sm">{element?.category}</span>
                  </div>
                  <div className="flex flex-col gap-0.5">
                      <span className="font-bold">Discovered by</span>
                      <span className="text-sm">{element?.discovered_by || 'N/A'}</span>
                  </div>
                  <div className="flex flex-col gap-0.5">
                      <span className="font-bold">Named by</span>
                      <span className="text-sm">{element?.named_by || 'N/A'}</span>
                  </div>

              </div>
          </div>
          <div className="w-full min-w-0 p-8 flex flex-col gap-6 border border-black dark:border-white">
              <div className="flex flex-col gap-1">
                  <span className="font-bold">What element is {element?.symbol} on the periodic table?</span>
                  <span className="text-sm">{element?.symbol} is the element {element?.name} on the periodic table.</span>
              </div>
              <div className="flex flex-col gap-1">
                  <span className="font-bold">What is the symbol for {element?.name} on the periodic table?</span>
                  <span className="text-sm">The symbol for {element?.name} on the periodic table is {element?.symbol}.</span>
              </div>
              <div className="flex flex-col gap-1">
                  <span className="font-bold">What does {element?.name} look like?</span>
                  <span className="text-sm">To the human eye, {element?.name} is {element?.appearance}.</span>
              </div>
          </div>

      </div>
  )
}<head>
tag of the page, we can see that Next.js has inserted the metadata we defined in the generateMetadata()
function!
<head> tag
123456789
<title>What is Ag on the periodic table?</title>
<meta name="description" content="Ag is the element Silver on the periodic table.">
<meta name="keywords" content="Silver,Ag,periodic table,element,chemistry">
<meta property="og:title" content="What is Ag on the periodic table?">
<meta property="og:description" content="Ag is the element Silver on the periodic table.">
<meta property="og:site_name" content="Atomic Chart">
<meta name="twitter:card" content="summary">
<meta name="twitter:title" content="What is Ag on the periodic table?">
<meta name="twitter:description" content="Ag is the element Silver on the periodic table.">opengraph-image.tsx
file to the [slug]
folder. In this file we can use our element data similar to the page.tsx
file. Here's the full code:
src/app/elements/[slug]/opengraph-image.tsx
123456789101112131415161718192021222324252627282930313233
import { ImageResponse } from 'next/og'
import elementData from "@/data/elements.json"

export const size = {
  width: 1200,
  height: 630,
}

export const contentType = 'image/png'

export default async function Image({ params }: { params: Promise<{ slug: string }> }) {

  const slug = (await params).slug.toLowerCase()
  const element = elementData.elements.find((element) => element.name.toLowerCase() === slug)

  return new ImageResponse(
      (
          <div tw="text-4xl w-full h-full bg-white flex items-center justify-center">
              <div tw="relative w-full h-full p-8 flex flex-col justify-center items-center">
                  <span tw="absolute top-12 left-12 text-6xl">{element?.number}</span>
                  <div tw="flex flex-col items-center pb-8">
                      <span tw="text-[148px] leading-[1] font-bold">{element?.symbol}</span>
                      <span tw="text-[44px]">{element?.name}</span>
                  </div>
                  <span tw="absolute bottom-12 text-2xl">{element?.atomic_mass}</span>
              </div>
          </div>
      ),
      {
          ...size,
      }
  )
}tw="..."
prop to apply tailwind styles rather than the typical className="..."
, as Image Generation works slightly differently than a standard Next.js page. You'll also notice in a moment that the font seems different in the OG image, which is again due to differences between dynamic image generation and standard Next.js pages. If you're interested in learning more about the differences between the two, I'd recommend reading the official documentation. For now, we'll leave this implementation as is, as it's good enough for our purposes.
If we inspect the page source in our browser, we can see that an og:image tag has been added to the <head>
. And if we visit the URL of the og:image, we see it working!
localhost:3000/elements/silver/opengraph-image?70e8388d5ea58223
sitemap.ts
file in your app
folder:
src/app/sitemap.ts
123456789101112131415161718192021222324252627282930
import { MetadataRoute } from 'next'

// Import the element data
import elementData from "@/data/elements.json"

export default function sitemap(): MetadataRoute.Sitemap {

// IMPORTANT: Use your production URL here!
const baseUrl = "https://www.atomicchart.com"

// Generate sitemap entries for /elements/[slug] pages
const elementsPages = elementData.elements.map((element) => ({
  url: `${baseUrl}/elements/${element.name.toLowerCase()}`,
  lastModified: new Date(),
  changeFrequency: 'weekly' as const,
  priority: 0.8,
}))

return [
  // Home page - we'll update this page later
  {
    url: baseUrl,
    lastModified: new Date(),
    changeFrequency: 'daily' as const,
    priority: 1,
  },
  // Elements pages
  ...elementsPages
]
}/sitemap.xml
, we can see the working sitemap!
localhost:3000/sitemap.xml
1234567891011121314151617181920212223
<urlset xmlns="http://www.sitemaps.org/schemas/sitemap/0.9">
  <url>
    <loc>https://www.atomicchart.com</loc>
    <lastmod>2024-12-04T03:45:17.614Z</lastmod>
    <changefreq>daily</changefreq>
    <priority>1</priority>
  </url>
  <url>
    <loc>https://www.atomicchart.com/elements/hydrogen</loc>
    <lastmod>2024-12-04T03:45:17.614Z</lastmod>
    <changefreq>weekly</changefreq>
    <priority>0.8</priority>
  </url>
  <url>
    <loc>https://www.atomicchart.com/elements/helium</loc>
    <lastmod>2024-12-04T03:45:17.614Z</lastmod>
    <changefreq>weekly</changefreq>
    <priority>0.8</priority>
  </url>
  ...
  ... (+116 more elements)
  ...
</urlset>use cache
directive. This enables us to create 'islands' of dynamic content that can be cached with a configurable lifetime. Combined with <Suspense>
, our page essentially becomes a static shell, with the dynamic content streaming in as needed (more on this later).
Enable Cache Components
First, enable Cache Components in next.config.ts
:
next.config.ts
1234567
import type { NextConfig } from "next";

const nextConfig: NextConfig = {
cacheComponents: true,
};

export default nextConfig;elements.json
has our periodic table data, but if we want to display more interesting content, we need to fetch that content from somewhere.
In this example, we'll fetch a summary from Wikipedia, but in reality this could come from anywhere. Let's write a simple fetch function that we can call from a server component:
src/utils/getWikipediaSummary.ts
1234567891011121314
export default async function getWikipediaSummary(
  title: string
): Promise<string | null> {
  try {
      const response = await fetch(
          `https://en.wikipedia.org/api/rest_v1/page/summary/${encodeURIComponent(title)}`
      )
      if (!response.ok) return null
      const data = await response.json()
      return data.extract || null
  } catch {
      return null
  }
}WikipediaSummary
component with two key additions: the "use cache"
directive and cacheLife("days")
. This tells Next.js to cache the Wikipedia response for one day, so we're not hitting Wikipedia on every page load, but the content stays relatively fresh.
We wrap it in a <Suspense>
boundary with a loading skeleton, so the rest of the page renders immediately while the Wikipedia content streams in:
src/app/elements/[slug]/page.tsx
12345678910111213141516171819202122232425262728293031323334353637383940414243444546474849505152
import { Suspense } from "react"
import { cacheLife } from "next/cache"
import elementData from "@/data/elements.json"
import getWikipediaSummary from "@/utils/getWikipediaSummary"

// ... generateMetadata (same as step 6)

// ... generateStaticParams (same as before)

export default async function ElementPage({ params }: { params: Promise<{ slug: string }> }) {

  const slug = (await params).slug
  const element = elementData.elements.find((element) => element.name.toLowerCase() === slug.toLowerCase())

  if (!element) { ... }

  return (
      <div className="w-full flex flex-col gap-4">

          {/* ... existing static content (element card + FAQ) ... */}

          <Suspense fallback={
              <div className="w-full min-w-0 p-8 border border-black dark:border-white animate-pulse">
                  <div className="h-4 bg-gray-200 dark:bg-gray-800 rounded w-1/3 mb-4"></div>
                  <div className="h-3 bg-gray-200 dark:bg-gray-800 rounded w-full mb-2"></div>
                  <div className="h-3 bg-gray-200 dark:bg-gray-800 rounded w-5/6"></div>
              </div>
          }>
              <WikipediaSummary elementName={element.name} />
          </Suspense>

      </div>
  )

}

async function WikipediaSummary({ elementName }: { elementName: string }) {
"use cache"
cacheLife("days")

  const summary = await getWikipediaSummary(elementName)
  if (!summary) return null

  return (
      <div className="w-full min-w-0 p-8 flex flex-col gap-2 border border-black dark:border-white">
          <span className="font-bold">About {elementName}</span>
          <span className="text-sm">{summary}</span>
          <span className="text-xs text-gray-500 dark:text-gray-400">Source: Wikipedia</span>
      </div>
  )

}-
"use cache": tells Next.js to cache the component's rendered output. The cache key is automatically derived from the component's props (in this case,elementName), so each element gets its own cache entry.
-
cacheLife("days"): sets the cache lifetime. Other options include"hours","weeks", and"max".
-
<Suspense>: wraps our cached component so that the static parts of the page (the element card and FAQ) can render immediately, while the Wikipedia content streams in. Thefallbackprop defines the loading skeleton shown while the content loads.
next build
, you'll notice the element pages are now marked with ◐
instead of ○
:
Build output
12345678910
Route (app)                      Revalidate  Expire
┌ ○ /
├ ○ /_not-found
├ ◐ /elements/[slug]                     1d      1w
├ └ [+117 more paths]
└ ƒ /sitemap.xml

○ (Static) prerendered as static content
◐ (Partial Prerender) prerendered as static HTML with dynamic server-streamed content
ƒ (Dynamic) server-rendered on demand◐
means the page is a mix of static and cached content. The 1d
revalidation and 1w
expiry correspond to the cacheLife("days")
we set. The static shell serves instantly on every request, and the Wikipedia content is served from cache (or fetched fresh if the cache has expired).
8. Create a home page
The last thing we'll do is a home page where you can see all the elements on the periodic table (or in a list view on mobile). This is obviously good for user experience, but internal linking is also a necessary practice to help search engines understand your site.
Here's the code for our periodic table home page:
src/app/page.tsx
1234567891011121314151617181920212223242526272829303132333435363738394041424344454647484950515253545556575859606162636465666768697071727374757677787980
import { elements } from '@/data/elements.json';
import Link from 'next/link';

// Group elements by category
const groupedElements = elements.reduce((acc, element) => {
  const category = element.category || 'Other';
  if (!acc[category]) {
    acc[category] = [];
  }
  acc[category].push(element);
  return acc;
}, {} as Record<string, typeof elements>);

// Helper function to generate empty grid positions
const emptyGridPositions = Array.from({ length: 18 * 10 }, (_, index) => {
  const ypos = Math.floor(index / 18) + 1;
  const xpos = (index % 18) + 1;
  return { ypos, xpos };
}).filter(pos =>
  !elements.some(el => el.xpos === pos.xpos && el.ypos === pos.ypos)
);

export default function Home() {
  return (
    <>
      {/* Desktop view - periodic table grid */}
      <div className="hidden lg:grid grid-cols-18 gap-[2px] w-full box-border">
        {elements.map((element) => (
          <Link
            title={element.name}
            key={element.number}
            href={`/elements/${element.name.toLowerCase()}`}
            className="cursor-pointer relative flex flex-col justify-center items-center p-1 w-full min-w-0 aspect-square text-xs bg-white dark:bg-black border border-black dark:border-white hover:z-10 hover:scale-150 transition-transform box-border"
            style={{
              gridRow: element.ypos,
              gridColumn: element.xpos
            }}
          >
            <div className="font-semibold">{element.symbol}</div>
            <div className="text-[8px] truncate">{element.name}</div>
          </Link>
        ))}

        {/* Add empty grid boxes */}
        {emptyGridPositions.map((pos, index) => (
          <div
            key={`empty-${index}`}
            className="border min-w-0 border-black/30 dark:border-white/20 aspect-square box-border"
            style={{
              gridRow: pos.ypos,
              gridColumn: pos.xpos
            }}
          />
        ))}
      </div>

      {/* Mobile view - categorized list */}
      <div className="lg:hidden w-full">
        {Object.entries(groupedElements).map(([category, categoryElements]) => (
          <div key={category} className="pb-8">
            <h2 className="font-bold text-lg mb-2">{category}</h2>
            <div className="grid grid-cols-2 gap-2">
              {categoryElements.map((element) => (
                <Link
                  title={element.name}
                  key={element.number}
                  href={`/elements/${element.name.toLowerCase()}`}
                  className="flex items-center p-2 border"
                >
                  <div className="font-semibold text-lg mr-2">{element.symbol}</div>
                  <div className="text-sm">{element.name}</div>
                </Link>
              ))}
            </div>
          </div>
        ))}
      </div>
    </>
  );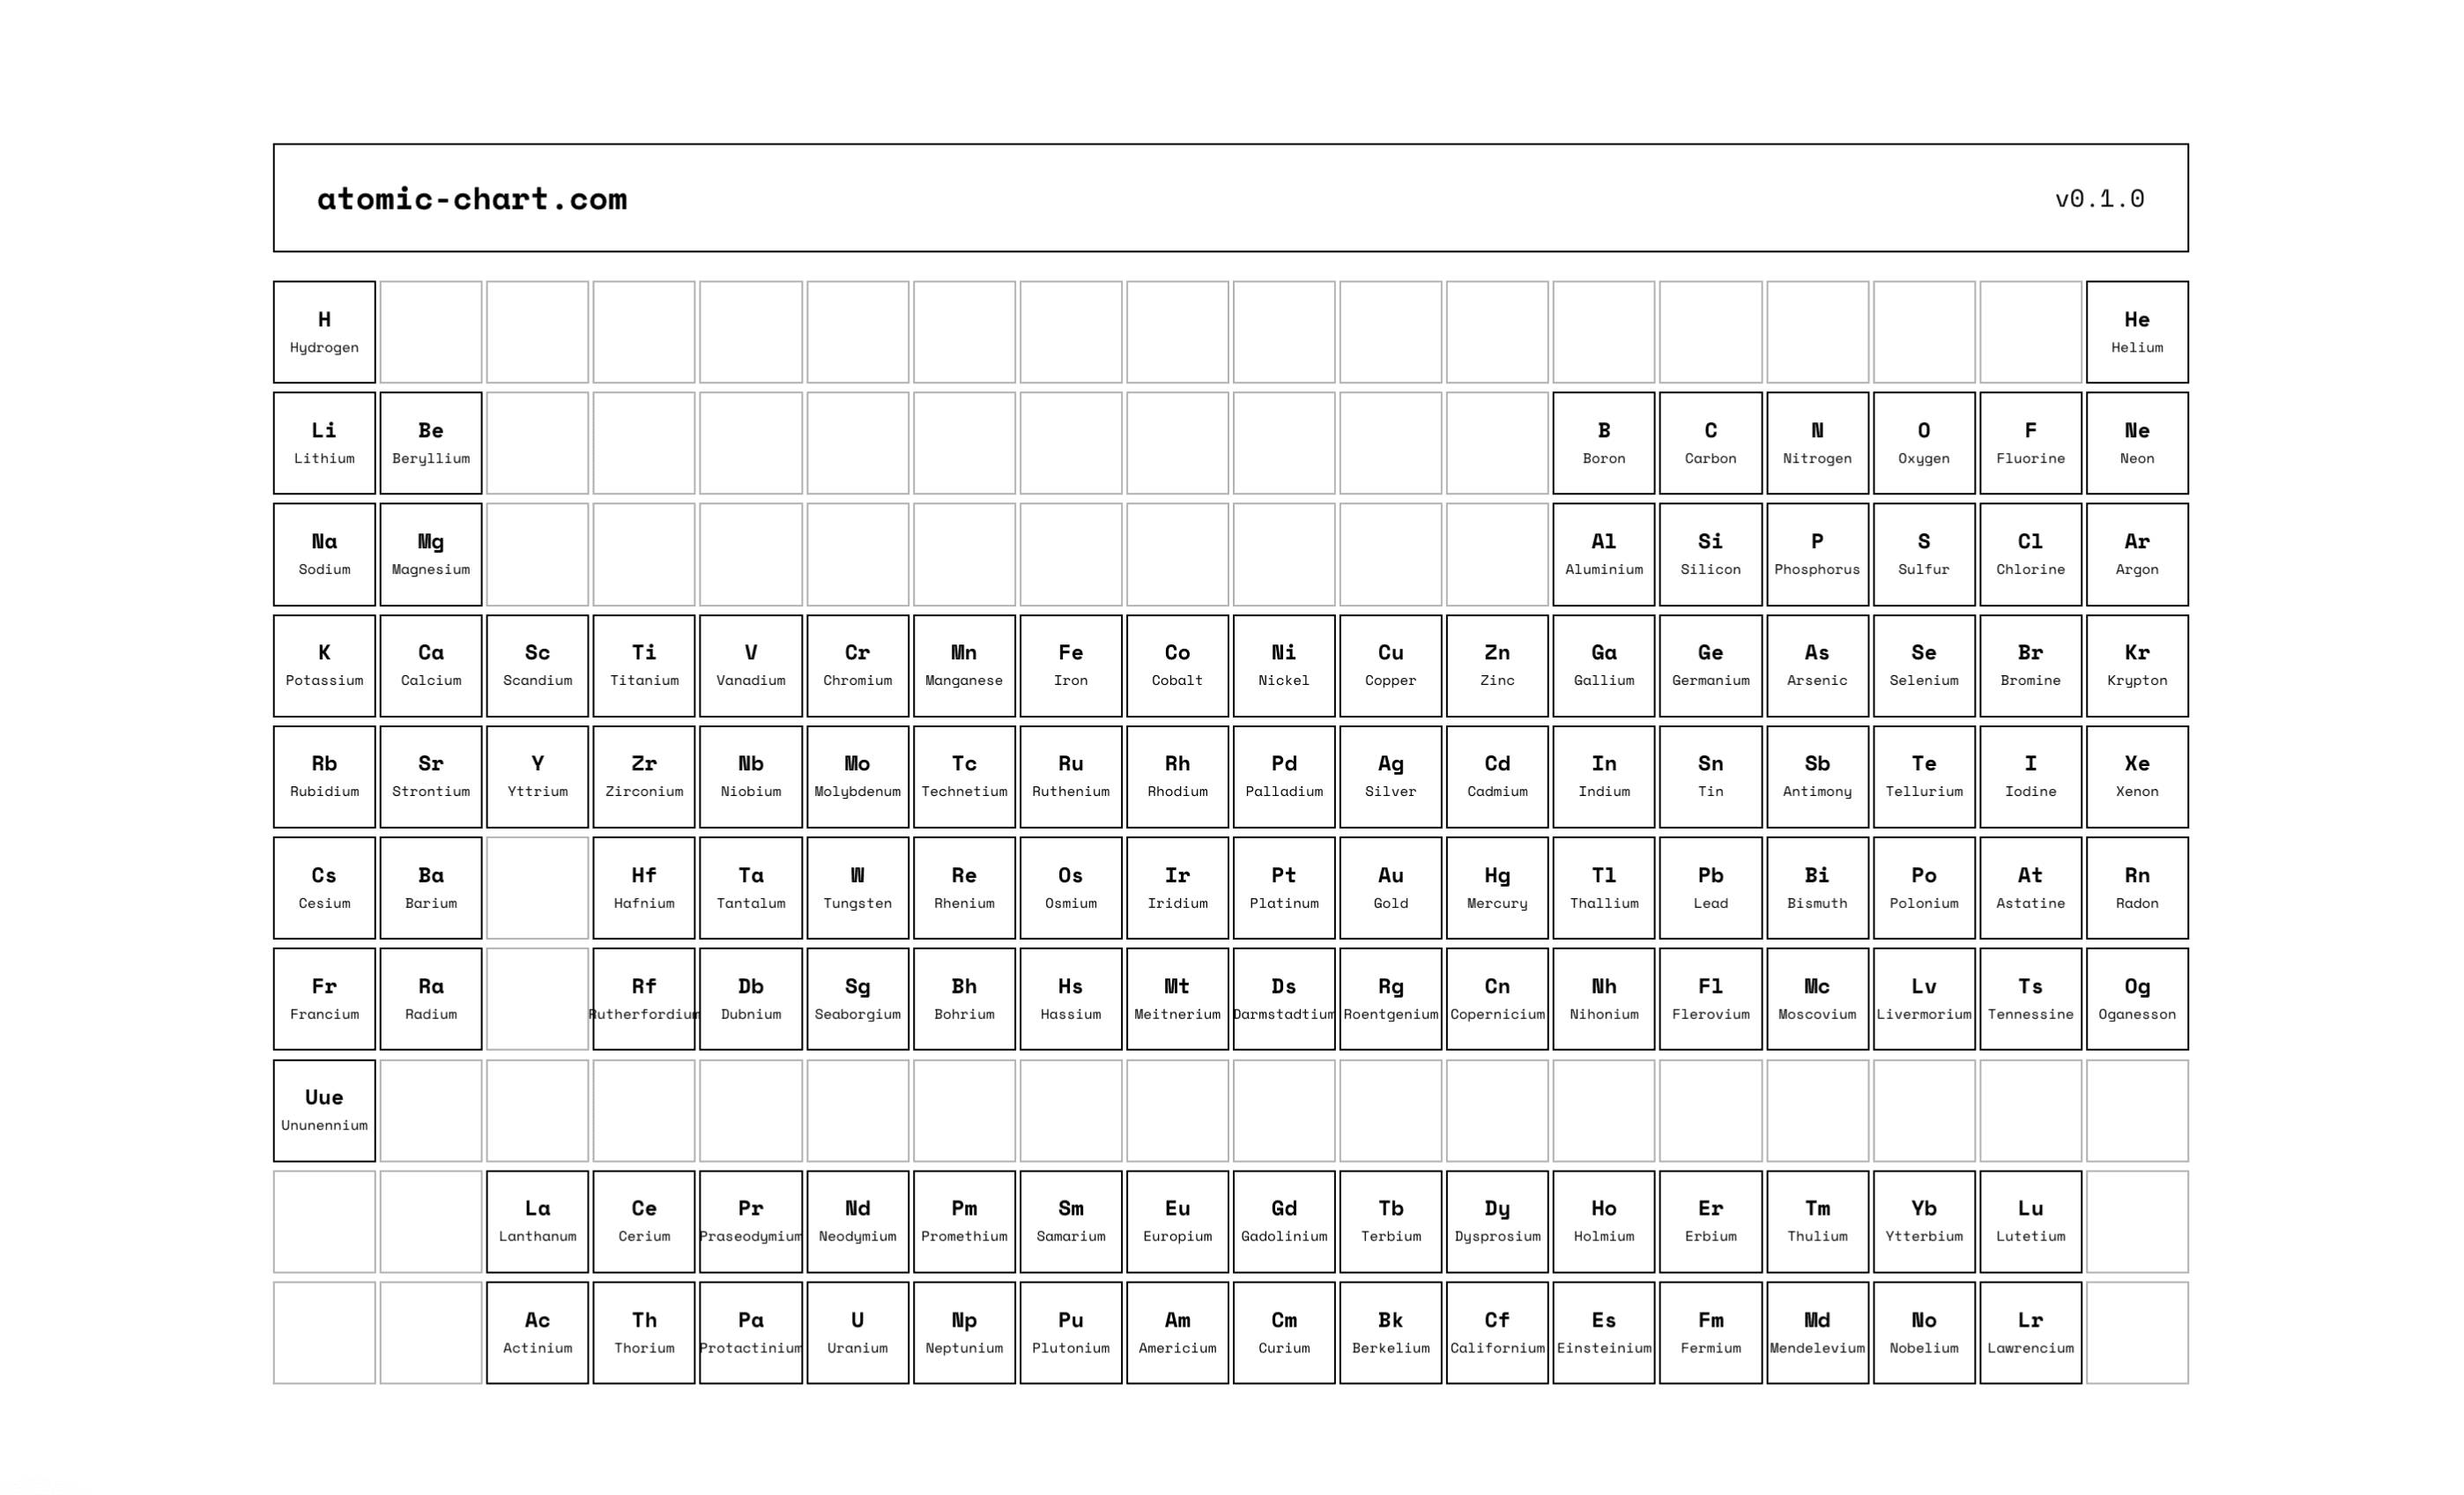
}localhost:3000
https://vercel.com/new
sitemap.ts
file. This is important for the sitemap to work correctly!
Conclusion
That's it! We've done quite a lot, but we could still take it a lot further given more time. I'll likely update this article in the future to improve things where possible. If you have any questions, send me a DM on X / Twitter. Have a great day, and may you be blessed with bountiful traffic.